So your fuel gauge says 5 all the time and you just topped it off with 11 gallons huh? If the display is illuminated, but the fuel registration disagrees with what you know is in the tank, then the sending unit is most likely at fault. Over time fuel "varnish", from the gradual decomposition of gasoline, coats the resistor element and float contacts interrupting the circuit. You need to remove the sending unit from the tank. This means the fuel tank will be open to the atmosphere. The likelihood of something going wrong is extremely remote at best but BE CAREFUL anyway! Keep a fire extinguisher at hand. Keep tools and parts away from the open fuel tank so they don't fall in. Provide plenty of ventilation. Most of all DON'T SMOKE while you're doing this (you shouldn't smoke anyway, it's bad for you)!
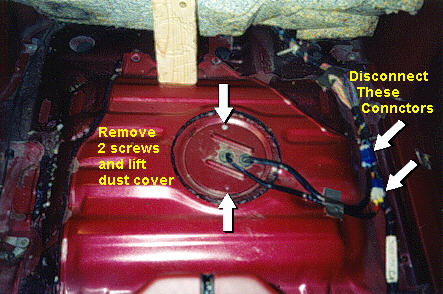
Removing the sending unit. Pull back the carpet and sound mat in the back of the car. There you will find a cover with 2 screws in the center of the floor with several wires coming through it.
Unplug the connectors and remove the cover. Below this is a plate with 6 or so screws and the wires attached to it. This is the outer end plate of the sending unit. Thoroughly Brush away any dirt and debris on and around the end plate. Remove the screws and GENTLY start pulling the plate straight up.
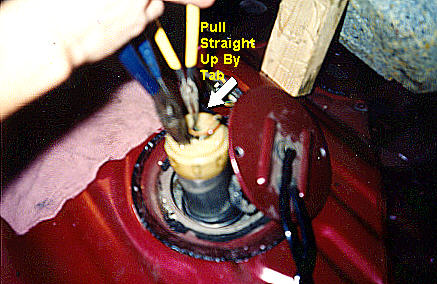
You may have to move it side to side and rotate but it will come out. Do not force it. The bottom end plate is held on with a retaining wire which can be bent and the end plate, wire, float and tube will fall back into the tank. Then you're screwed. Take your time and get it out in one piece.

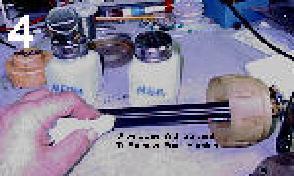
Disassembly and cleaning. Holding the unit up-side-down remove the pin from the end and carefully remove the end cap and tube. You MUST note the orientation of the float on a piece of paper or in your mind before sliding it off. If you don't you'll have a 25% chance of putting it on right (2 180° increments times 2 planes of rotation). The heart of the sending unit is a ceramic coated steel bar element with "printed on" carbon resistors and "lands". DO NOT bend this under any circumstance! If you do you will crack the ceramic and open the circuits. It is pretty rugged so you would almost have to do so intentionally. Get some Acetone, Tri-chlor, MEK or any strong industrial solvent (hardware store should have it). Scrub the element with a paper towel and solvent several times until no more yellow/brown varnish comes off on the towel.
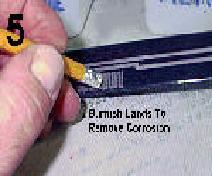
You can also polish the long "lands" on the element with a Pink Devil drafting eraser or a pencil eraser.
Inspect the inside the float for bent or missing leaf contacts. Clean the tips of the contacts CAREFULLY with a cotton swab soaked in solvent. Don't bend them.
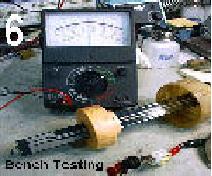
Electrical bench testing.
 meetwaarden
zijn terug te vinden in de FSM
meetwaarden
zijn terug te vinden in de FSM
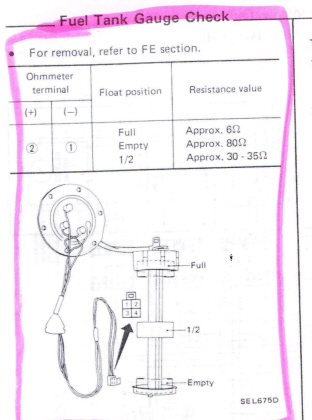
Referring to the table below, and using an ohm meter, measure across the pin pairs indicated and look for these resistance values at the corresponding float positions. Choose the data matrix for your type of dash. Click image below to see float positions.
+ |
- |
Position |
In Ohms |
+ |
- |
Position |
In Ohms |
|
Empty ½ Full |
Approx. 480 - 520 Approx. 100 - 110 |
Empty ½ Full |
Approx. 80 Approx. 30 - 35 |
|||||
B |
Approx. 870 - 930 |
B |
Less Than 6 |
|||||
Reassembly and reinstallation. Holding the unit up-side-down slide the float back on while observing the correct orientation. Slip the tube and the end plate on. Insert the pin under the "hook" in the end. Before reinserting into the fuel tank be sure the rubber "O" ring seal is in place and undamaged. This is important as the tank pressurizes during operation venting fumes and moisture could seep in during periods of inoperation. Carefully negotiate the sending unit into the the fuel tank, fasten and reconnect the cable. Watch your fuel gage over the next few days and see what it does. It may not be perfect but if it is working right it will be reasonably accurate and you will always know when your tank is full and when it is empty.
